Category Archives: Tips&Tricks

windows.updateTask – the hidden gem in Universal Windows Platform

There is one feature in the Universal Windows Platform (UWP) that is not widely known, but it’s extremely helpful when releasing update of your app. It’s the windows.updateTask.

What it is? The updateTask is a special kind of Background Task that you can have in your app. Background Tasks are pieces of code that can be executed on periodic basis, or when the user logs in or out, or when the push notification arrives or in other cases as described on MSDN. For the standard Background Tasks the app needs to be started first and you need to manually register your background task within the app. In case the app is never launched, the background task cannot be registered and is never executed.

And here comes the magic of the updateTask. The class registered as updateTask in package.appxmanifest is executed automatically when Windows Store updates your app with a new version.

Why should I use it?

There is couple of scenarios when automatically executed code once the app is updated is useful:

  • app db/files maintenance or migration –  you can update the SQLite db schema before the new version is launched for the first time, or delete/move temp files to a new location.
  • re-register classic background tasks, or register new ones – it’s recommended to check in new version of your app if all background tasks are registered properly. What is even more useful, you can register standard background tasks inside the updateTask!
  • show notification about new app version – this is probably the most interesting feature that I use in my app Astronomy Picture of the Day. About two months ago I released the first Windows 10 version of my app, previously I had Win8.1 version, and I included update task to show toast notification, that completely new version of my app was just installed! It’s possible that some users had my old version installed and thanks to the updateTask I was able to show them that new UWP version is now available.

The caveats

Just like with other Background Tasks be careful when using the updateTask – it’s not guaranteed that it will be executed at all, or not terminated in the middle. If you plan to add db migration into it, make sure this migration is checked and done after app start as well. The same approach should be used for registering new background task, always check them when the app is started. And with the toast notifications, often less is more. Too many toast notifications could lead to your app being uninstalled, so be careful.

The updateTask is a useful tool, but use it with caution.

How to use it?

First of all the updateTask is supported in all Windows 10 UWP apps and also in Windows Phone 8.1 XAML apps, but not in Windows 8 or 8.1 desktop apps.

When adding classic Background Task to your app it’s recommended to use the package.appxmanifest editor, but strangely the updateTask is not available in the list of extensions. One can only wonder why? Because it can be misused or it’s primarily targeted for OEMs or 1st party apps? Who knows.


For adding the updateTask you need to edit the package.appxmanifest file manually like this:

The Category part is fixed, the EntryPoint part must be the full name of the IBackgroundTask implementation class where the code for your updateTask is located. And just like with other Background Tasks, the updateTask code must be placed in a separate project of type Windows Runtime Component.

This is how the code for your updateTask could look like:

public sealed class UpdateTask : IBackgroundTask
{
    public async void Run(IBackgroundTaskInstance taskInstance)
    {
        BackgroundTaskDeferral deferral = taskInstance.GetDeferral();
        try
        {
            // ensure the periodic agent each time the app is updated
            await BackgroundTaskService.EnsurePeriodicAgent();
            ShowUpdateToast();
        }
        catch (Exception e)
        {
            Debug.WriteLine($"Exception when executing UWP background task {e}");
            if (Debugger.IsAttached) Debugger.Break();
        }
        finally
        {
            Debug.WriteLine("Background agent end");
            deferral.Complete();
        }
    }
 
    private void ShowUpdateToast()
    {
        ToastNotifier updater = ToastNotificationManager.CreateToastNotifier();
        if (updater.Setting != NotificationSetting.Enabled) return;
 
        // create template for the toast message
        IToastImageAndText03 toastData = ToastContentFactory.CreateToastImageAndText03();
        toastData.Image.Src = "ms-appx:///Assets/starry-night.jpg";
        toastData.TextHeadingWrap.Text = AppResources.UpdateMessage;
 
        // send the udpate toast
        ToastNotification toast = toastData.CreateNotification();
        updater.Show(toast);
    }
}

Testing the updateTask

To test your Update Task, you will need to use the Application Deployment tool to install the initial version of your app and then install your updated app using the /update flag, at which point your Update Task will run.

Conclusion

It’s really easy to add to your Windows 10 UWP app short piece of code, that is executed once the app is updated through Windows Store. I’ve not seen any article or blog post describing the usefulness of this feature except this short MSDN documentation. Without knowing that this feature exists, there is no way to find it.

I hope this article helped you make your UWP app even better. If you have any comments or thoughts, just let me know in the discussion below, or just ping me on my Twitter 🙂

Hacking UWP WebView Part 3. Bypassing HTTPS certificate validation in UWP WebView

As described in my previous article Hacking UWP WebView Part 1. Displaying HTTPS page with invalid certificate in UWP WebView, there is a limited way how to display HTTPS web page with invalid certificate in the UWP WebView. It requires using fake IUriToStreamResolver for making proxy requests to the target web with modified HttpClient that is ignoring certificate errors.
I’ve even added the possibility to easily load pages with certificate errors to my WebView wishlist of missing features in my article Make WebView great again!.

Luckily, while developing Seznam.cz app for Windows 10 Mobile (Czech only), currently the most advanced browser available on Windows Store, I’ve found another way how to display web page with invalid domain certificate in a WebView. The problem with this solution is that it looks more like a vulnerability or oversight, because the behavior described below is not documented anywhere.

How it works

First some theory, when navigating in WebView to web site with invalid domain certificate, the NavigationFailed event is raised with WebErrorStatus equal to CertificateIsInvalid. This is the expected behavior for webs with invalid certificates.

To change this behavior we need to create HttpBaseProtocolFilter instance and set it in a way to ignore all ignorable certificate validation errors like this:

HttpBaseProtocolFilter filter = new HttpBaseProtocolFilter();
filter.IgnorableServerCertificateErrors.Add(ChainValidationResult.Untrusted);
filter.IgnorableServerCertificateErrors.Add(ChainValidationResult.Expired);
filter.IgnorableServerCertificateErrors.Add(ChainValidationResult.IncompleteChain);
filter.IgnorableServerCertificateErrors.Add(ChainValidationResult.WrongUsage);
filter.IgnorableServerCertificateErrors.Add(ChainValidationResult.InvalidName);
filter.IgnorableServerCertificateErrors.Add(ChainValidationResult.RevocationInformationMissing);
filter.IgnorableServerCertificateErrors.Add(ChainValidationResult.RevocationFailure);

Then we’ll create HttpClient instance with this filter and make Head request to the target site that has invalid certificate.

Uri uri = new Uri("https://expired.badssl.com/");
HttpClient hc = new HttpClient(filter);
HttpRequestMessage request = new HttpRequestMessage(HttpMethod.Head, uri);
HttpResponseMessage response = await hc.SendRequestAsync(request);

This request most likely succeeds with HTTP Status Code 200. That’s because the HttpBaseProtocolFilter ignores the error we added to the IgnorableServerCertificateErrors list.

Up until now this is all expected behavior of the HttpBaseProtocolFilter and HttpClient class.

What is NOT expected – when you now try to navigate to the same web with invalid certificate inside a WebView now, it works!

Wait, what just happened?

Good question, I have no idea 🙂
Actually I have a hunch that both WebView and HttpBaseProtocolFilter shares the same network stack and somehow when doing request with HttpClient with filter configured to ignore certificate errors, the network stack caches the information about the target domain to ignore certificate errors from now on.
I’ve done some research to pinpoint the actual behavior and here is the result:

  • It works like described on Windows 10 Anniversary Update, both Desktop and Mobile, with latest cummulative update (November 2016).
  • It’s necessary to ignore the specific certificate error type for the target domain when doing the HttpClient request with HttpBaseProtocolFilter.
  • The navigation with invalid certificate in WebView then works only for the specific domain.
  • Requests to the target domain then work even in new instance of HttpClient with new, empty HttpBaseProtocolFilter.
  • I was not able to make the target domain un-ignore certificate errors for the rest of app lifetime – all requests to the target web work as long as the app live.

Conclusion

The unforseen consequences in this behavior might be dire – just by making request to target domain with ignoring HttpBaseProtocolFilter in one part of the app, completely different part of the app might start trusting expired or invalid certificates in a WebView. On one hand we discovered, how to easily load page with invalid certificate in the WebView, but on other hand this could compromise the overall security of our app.

There are also some unanswered questions – what happens when using ignoring HttpBaseProtocolFilter in app contracts, calling one app from another?
What happens If I try to use ignoring HttpBaseProtocolFilter in App Extension?
What happens if I create extension for Edge and I use this method on www.microsoft.com, does it mean it could lead to easy way how to MITM any site? Or there are separate network stacks for each app including extensions?
I plan to update this article once I find answers to these questions. For now you can discuss this issue with me on Twitter.

UWP Quick Tip – detecting any installed app on Windows 10

In this blog post I’ll show you how simple it is to detect from any regular 3rd party Windows 10 app if any target app is installed on the same device.

The motivation

Typical scenario, you are a publisher with 5 popular apps on Windows Store. User has just installed your App.A and you’d like to know if he has already installed App.B, App.C, etc, and if not, you would like to show Toast notification to promote the other apps you have published.

The solution

I won’t beat around the bush, all you need is the package family name of all apps you want to discover and this method:
Launcher.QueryUriSupportAsync(Uri uri, LaunchQuerySupportType launchQuerySupportType, string packageFamilyName)

This method is part of the Launcher class and the primary goal of this method is to detect, whether target app X supports Uri scheme Y, but due to some oversight or maybe intentionally it can be used for detecting whether any target app is installed on the same device or not. You can use it even for detecting installed Windows 8.1 apps, Windows Phone 8.1 apps or even Edge extensions!

How it works?

private static readonly Uri dummyUri = new Uri("mailto:dummy@seznam.cz");
 
/// <summary>
/// Check if target <paramref name="packageName"/> is installed on this device.
/// </summary>
/// <param name="packageName">Package name in format: "949FFEAB.Email.cz_refxrrjvvv3cw"</param>
/// <returns>True is app is installed on this device, false otherwise.</returns>
public static async Task<bool> IsAppInstalledAsync(string packageName)
{
    try
    {
        bool appInstalled;
        LaunchQuerySupportStatus result = await Launcher.QueryUriSupportAsync(dummyUri, LaunchQuerySupportType.Uri, packageName);
        switch (result)
        {
            case LaunchQuerySupportStatus.Available:
            case LaunchQuerySupportStatus.NotSupported:
                appInstalled = true;
                break;
            //case LaunchQuerySupportStatus.AppNotInstalled:
            //case LaunchQuerySupportStatus.AppUnavailable:
            //case LaunchQuerySupportStatus.Unknown:
            default:
                appInstalled = false;
                break;
        }
 
        Debug.WriteLine($"App {packageName}, query status: {result}, installed: {appInstalled}");
        return appInstalled;
    }
    catch (Exception ex)
    {
        Debug.WriteLine($"Error checking if app {packageName} is installed. Error: {ex}");
        return false;
    }
}

The method returns enum of possible outcomes, either the target app is installed and supports the target Uri scheme, or is installed but does not support it, or is not installed, or in other unsupported state.

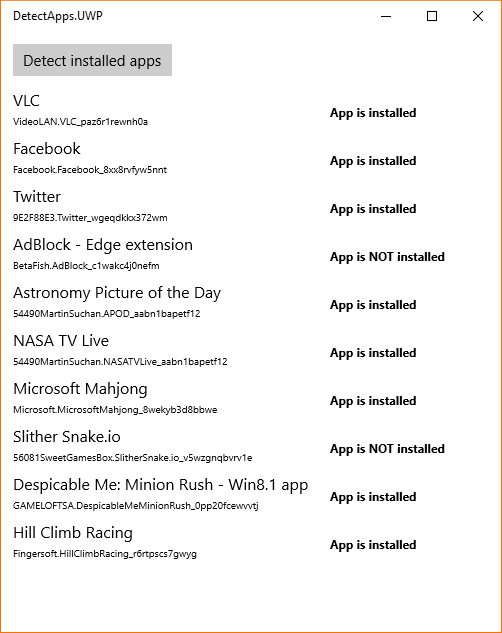
Before checking this approach myself I would have expected, that for apps published by other developers it would just return generic Unknown response, if the Uri scheme is not supported or the app is not installed, but it works just fine as shown below.

Sample app

I’ve uploaded simple app on GitHub that checks for installation status of some popular apps and games. This is the result when I run this app on my Windows 10 Desktop machine with Windows 10 build 14393 (Anniversary Update).

detectapps

F.A.Q.

Does it work on Windows 10 Mobile/Xbox/HoloLens?

Yes

How can I get the package family names to use?

It’s quite easy, just install the app on your machine and open the folder:
C:\Users\<username>\AppData\Local\Packages
Here you can find app data for all your installed apps from Windows Store. The folders here use the package family names.

packages

The only problem here is that you cannot access this folder on Windows 10 Mobile or Xbox, but Universal apps use the same package family name on all platforms.
Note there might be other ways how to detect the package family names for Windows Phone-only apps. If you find them, just let me know!

Do I need any special App Capability? Does it pass Windows App Certification Kit?

No special capability required. No problem with WACK.

Why is this a problem?

First of all Windows Store apps should run in a Sandbox and by design one app should not be able to detect anything about other installed apps.

Since we can detect if other apps are installed, this feature could be easily misused for nefarious purposes like Targeted Advertising, Device Fingerprinting or Behavior Detection.
For instance Bank app can gather information about number of installed games or social networks to profile the target user.
Game developer can gather intel what other popular games are installed on the same machine.
Malware app or library could detect what social network apps is the target user using, etc.

How this could be solved?

If the Windows OS team agrees that this needs to be fixed, this is the solution I can imagine. First there should be option in the App manifest to define Uri scheme detection as public for any app or private for only whitelisted apps. Then these rules should be applied:

  • if target app is not installed – return Unknown result.
  • if target app is installed and from the same publisher – no change in behavior. I should be able to ask if my apps are installed.
  • if target app is installed but does not support target Uri scheme – return Unknown result.
  • if target app is installed and has public Uri scheme – return Available result.
  • if target app is installed, has private Uri scheme and asking app is whitelisted, return Available result.
  • if target app is installed, has private Uri scheme and asking app is not whitelisted, return Unknown result.

Note the same fixes should be applied to File type support detection as well. I’ve not tested it, but I can imagine that the QueryFileSupportAsync method has the same behavior.

Summary

I’ve shown in this blog post that on Windows 10 device it’s really easy to detect if user has Twitter or Facebook or any other app installed, possible issues that this behavior could create and possible solution to solve it in the future.
For more UWP tips – follow me on Twitter 🙂

Make WebView great again!

When developing Universal Windows Platform (UWP) apps for Windows 10 one of the core elements developers often use is the WebView. It’s a control designed for displaying Web Pages, either from local or any online source. It’s basically a Frame for rendering HTML content powered by the EdgeHTML rendering core.

The WebView went through many iterations since its conception in Windows 8 in late 2012. It went from hard to use always-on-top element powered by IE10 Trident Core to a modern and quite capable control supporting current HTML5 standards and modern HTTPS cipher suites.

From a developers’ point of view lot of useful methods and settings was added in the Windows 10 version of WebView, for instance event handlers to allow access to Geolocation API or Webcam, detection when the website wants to open a new window, notification about loading state od each Frame, possibility to provide native object which is then available from the page DOM, and much more.

Unfortunately, the WebView, as it’s available today, is still incomplete in terms of usability and does not provide several critical APIs. In this article I have gathered the most important missing or incomplete WebView features that would make the WebView finally a first class citizen, or great again.

I sorted these features into three groups:

  • Must fix are critical security and/or functional features that cannot be implemented using any workaround
  • Should fix are features, that would make the WebView much easier to use, but are not critical for daily use or can be implemented using nontrivial workarounds, like JavaScript injection and notification back to the app
  • Nice to haves are optional improvements for making developer more happy 🙂

Note that all missing features requested below are already available in the Microsoft Edge browser. I’m not requesting something, that is not yet available in the EdgeHTML core for obvious reasons.

Continue reading

Hacking UWP WebView Part 2. Bypassing window.external.notify whitelist

This is a second part of my small series of blogposts about unlocking hidden features of Windows 10 UWP WebView. You can read the first part about Displaying HTTPS page with invalid certificate in UWP WebView here.

When using WebView in your Windows Store app you often need to communicate between your C# app and the code inside the WebView. For executing JavaScript code in WebView from C# it’s easy to use the WebView.InvokeScriptAsync method. This asynchronous action executes the specified script function from the currently loaded HTML with specific arguments. This method works on any page loaded in WebView.

But the problem arises when you want the JavaScript code in WebView to notify your C# code. By default the JavaScript should call the window.external.notify method with string parameter and this call then raises ScriptNotify event on the WebView. This call works fine when used on pages loaded from application resources, when using NavigateToString or when using NavigateToLocalStreamUri.

The problem

Unfortunately window.external.notify does not work when used in web pages loaded from Local storage using ms-appdata protocol. According to Microsoft this is by design “This was a policy decision we made”. I have no idea why this decision was made since it has no effect in terms of security, only makes development harder if I want to use ms-appdata Uri as WebView Source.

Lastly window.external.notify can be used in pages loaded from the Internet using standard HTTPS protocol, BUT it’s necessary to explicitly whitelist target domains in package.appxmanifest

Capture

In this whitelist editor it’s not possible to use HTTP addresses at all or generic wild-card to “enable all HTTPS websites”.
You can imagine that this is quite a big limitation. Let’s say you want to create your own browser that will be injecting JavaScript into all pages to find the used favicon – well, that’s not possible using the window.external.notify event.

The solution

Luckily there is a solution when developing apps for Windows 10 UWP: the WebView.AddWebAllowedObject method.

In Windows 10 it’s possible to create native class in C#, VB or C++ that can be passed to the WebView object and which behaves like a native JavaScript object. This class must be created in another Project of type Windows Runtime Component and marked with [AllowForWeb] attribute. JavaScript code then can call any method on this object and the actual code of this method runs in the C#/VB/C++ implementation.

//KeyHandler.cs
[AllowForWeb]
public sealed class KeyHandler
{
    public void setKeyCombination(int keyPress)
    {
        Debug.WriteLine("Called from WebView! {0}", keyPress);
    }
}
 
// MainPage.xaml.cs
private void Web_OnNavigationStarting(WebView sender, WebViewNavigationStartingEventArgs args)
{
    // WebView native object must be inserted in the OnNavigationStarting event handler
    KeyHandler winRTObject = new KeyHandler();
    // Expose the native WinRT object on the page's global object
    Web.AddWebAllowedObject("NotifyApp", winRTObject);
}
 
private async void Web_OnDOMContentLoaded(WebView sender, WebViewDOMContentLoadedEventArgs args)
{
    try
    {
        // inject event handler to arbitrary page once the DOM is loaded
        // in this case add event handlet to click on the main &lt;table&gt; element
        await Web.InvokeScriptAsync("eval",
            new[] { "document.getElementById(\"hnmain\").addEventListener(\"click\", function () { NotifyApp.setKeyCombination(43); }); "});
    }
    catch (Exception e)
    {
        Debug.WriteLine(e);
    }
}

And the best part? This native object can be passed and used in WebView with any page, completely ignoring the Content URIs domain whitelist in Package.appxmanifest.
This is a really good news for developers since they are no longer limited by artificial rules in the app manifest. But on the other hand it’s still necessary to carefully evaluate all calls from the native object. Keep in mind that any code on the page can access the native object as well and send malicious values to the app .

I’ve created simple sample where I load into my WebView the Hacker News web, inject KeyHandler native object and attach event handler when clicking the hnmain element that calls back method on the KeyHandler object back to the C# app.

Summary

It’s possible to use notification between C# and JavaScript code in both ways on any page loaded into WebView using the WebView.AddWebAllowedObject method. It’s quite easy to use it but keep in mind that with great power comes great responsibility.

UWP Quick tip – JumpLists

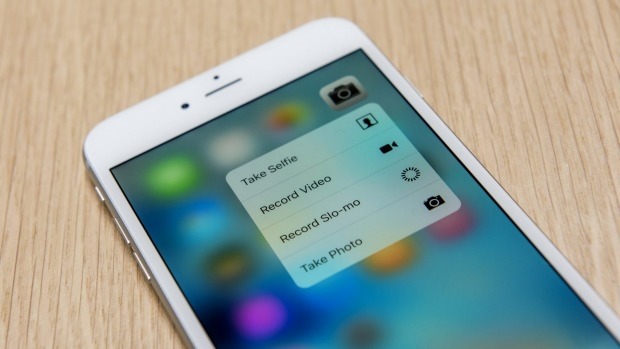
Have you heard about the new feature of iPhone 6S called 3D touch? It’s basically reinvented context menu on steroids that looks cool and can be useful in many cases, like providing quick context actions for apps on your home screen:
1441961116560

In this article I’ll show you, how to implement similar behavior in your Windows 10 UWP app using JumpList API.

First of all, this feature is not available in the Windows 10 RTM version. First you need to have the latest Windows 10 Insider preview build v10565 installed. Second you need to install the latest Windows beta SDK v10563 by following the guide here. Note you should not install this beta SDK on your production machine because you won’t be able to publish Store apps built with this SDK!

Once you have all this set up, it’s really straightforward, you just need to use the new JumpList API. This API allows you to place custom context menu items, that are shown when you right-click or tap-and-hold Tile of your Windows Store app.

Here’s a really simple code for adding those same Camera app context menu items to your Windows Store app:

JumpList jumpList = await JumpList.LoadCurrentAsync();
jumpList.Items.Clear();
 
JumpListItem item1 = JumpListItem.CreateWithArguments("selfie", "Take Selfie");
item1.Logo = new Uri("ms-appx:///Assets/selfie.png");
JumpListItem item2 = JumpListItem.CreateWithArguments("video", "Record Video");
item2.Logo = new Uri("ms-appx:///Assets/cam.png");
JumpListItem item3 = JumpListItem.CreateWithArguments("slomo", "Record Slo-mo");
item3.Logo = new Uri("ms-appx:///Assets/slomo.png");
JumpListItem item4 = JumpListItem.CreateWithArguments("photo", "Take Photo");
item4.Logo = new Uri("ms-appx:///Assets/cam.png");
 
jumpList.Items.Add(item1);
jumpList.Items.Add(item2);
jumpList.Items.Add(item3);
jumpList.Items.Add(item4);
await jumpList.SaveAsync();

Note that I’ve added four simple PNG images in Assets folder that are used for JumpListItems.
When you start your app and run this code, the context menu for your tile will look like this:

Screenshot (1)

And if you click one of those Tasks, the app launches with the provided argument in the e.Argument property, so it’s really easy to open the right UI for the right task:

Capture

And that’s all 🙂

I think the JumpList API is a really nice addition to the UWP ecosystem. It could be used not just for displaying list of recently opened document or projects, but also for quick tasks similar to context menus on iPhone 6S.

Note the JumpList sample should work on Windows 10 Mobile too, if you have the latest build v10549. You can test it on a phone as your homework 🙂

Hacking UWP WebView Part 1. Displaying HTTPS page with invalid certificate in UWP WebView

This is a first part of my small series of blogposts about unlocking hidden features of Windows 10 UWP WebView.

If you want to display web page content inside your Windows 10 UWP app, you need to use the WebView class. In standard scenarios you just set the Source property or use the Navigate(Uri) method to the target page and if your Internet connection works, the page shows up just like in Microsoft Edge.

But there is a caveat when using the method. If the target page is available only on HTTPS protocol and the Domain certificate for the target web is not valid (expired, self-signed, invalid domain name…) then the page won’t load, you only get the OnNavigationFailed event with WebErrorStatus.CertificateIsInvalid or similar indicator.

As you probably know, in standard browsers like IE, Chrome, Firefox or Edge there is always a semi-hidden option to override this certificate error and continue navigation to that page anyway, usually with a big warning that the connection won’t be secure and possible attacker could be eavesdropping your connection or even modifying the transmitted data. Yes, that’s the risk here, even though in 99.99% of cases no-one is actually eavesdropping you, only the server is just not properly configured.

Capture

If the target site uses self-signed HTTPS certificate and this self-signed certificate is otherwise valid for the target domain, there is a solution how to make the WebView work in this case – you just need to add the specific certificate inside Package.appxmanifest -> Declarations -> Certificates whitelist. Here you select the .cer file for your site with “TrustedPeople” as the Store name and all should just work. Another solution is to whitelist the Root certificate for this custom domain certificate and trust this self-signed Root. Unfortunately this solution only works for specific sites that you whitelist, not for any site with self-signed certificate.

Capture

In some valid scenarios you might need to display web content of HTTPS page with invalid certificate inside your Windows Store app, but how to do it? There is no property or method in WebView to override this behavior and enable navigation to a page with invalid certificate, but luckily I found a solution!

WebView in Windows Store apps has a method called NavigateToLocalStreamUri(Uri source, IUriToStreamResolver streamResolver) which is designed for loading local HTTP page with external resources, like HTML pages with extern CSS styles or images, that cannot be loaded just by using NavigateToString(Uri). How to use that method for loading local pages is shown in this short article.

In short you create special object implementing the IUriToStreamResolver interface, that has method IAsyncOperation<IInputStream> UriToStreamAsync(Uri uri). In this method you can handle all HTTP requests from the WebView and load your page resources from any source you want!

The solution

Even though the method is called NavigateToLocalStreamUri, it works just fine even when I manually download the requested resources from the Internet in the IUriToStreamResolver object using the HttpClient class. And with the fact, that HttpClient class allows us to ignore specific certificate errors when connecting to HTTPS web sites, we have a solution for our problem!

Here’s a quick and ugly proof of concept for the problem:

public sealed partial class MainPage
{
    public MainPage()
    {
        InitializeComponent();
    }
 
    protected override void OnNavigatedTo(NavigationEventArgs e)
    {
        base.OnNavigatedTo(e);
        Uri uri = new Uri("https://expired.identrustssl.com/");
 
        Uri localStreamUri = Web.BuildLocalStreamUri("MyTag", "/");
        BadHttpsStreamResolver resolver = new BadHttpsStreamResolver(uri, localStreamUri);
        Web.NavigateToLocalStreamUri(localStreamUri, resolver);
    }
}
 
public sealed class BadHttpsStreamResolver : IUriToStreamResolver
{
    private readonly string baseUri;
    private readonly string localStreamUri;
    private readonly HttpClient hc;
 
    public BadHttpsStreamResolver(Uri baseUri, Uri localStreamUri)
    {
        this.baseUri = baseUri.ToString();
        this.localStreamUri = localStreamUri.ToString();
        HttpBaseProtocolFilter filter = new HttpBaseProtocolFilter();
        // specify here which certificate errors should we ignore
        filter.IgnorableServerCertificateErrors.Add(ChainValidationResult.Expired);
        hc = new HttpClient(filter);
    }
 
    public IAsyncOperation UriToStreamAsync(Uri uri)
    {
        // TODO better uri validation and conversion
        Uri targetUri = new Uri(uri.ToString().Replace(localStreamUri, baseUri));
        return GetInputStream(targetUri).AsAsyncOperation();
    }
 
    public async Task GetInputStream(Uri targetUri)
    {
        try
        {
            HttpRequestMessage request = new HttpRequestMessage(HttpMethod.Get, targetUri);
            HttpResponseMessage response = await hc.SendRequestAsync(request);
            IInputStream stream = await response.Content.ReadAsInputStreamAsync();
            return stream;
        }
        catch (Exception ex)
        {
            Debug.WriteLine("Exception {0}", ex);
            return null;
        }
    }
}

How this works? We have a WebView named “Web” in the MainPage XAML. We have a sample page https://expired.identrustssl.com/ with expired domain certificate. First we create local stream Uri using the Web.BuildLocalStreamUri(“MyTag”, “/”) method. Then we create the instance of our online IUriToStreamResolver. In our stream resolver we just transform every local Uri to the proper online Uri and use the HttpClient class instance with HttpBaseProtocolFilter ignoring ChainValidationResult.Expired errors for downloading all resources that the page needs.

Here you can see, how the sample page is displayed just fine in my UWP Store app. Note this page uses external CSS file and three external images, all these resources were loaded using my BadHttpsStreamResolver class.

Capture

Possible problems with this solution

Sadly this solution is not almighty. It works fine for reasonably simple web sites, but not for highly dynamic sites using AJAX XMLHttpRequest, WebSockets or other advanced stuff. This method also won’t work for POST and other non-GET request on that page.

There is a project called Web Application Template that tries to solve some of these advanced scenarios, I’ve not tried it but it looks quite promising especially for solving the XMLHttpRequest problem by using injected proxy class that redirects all XMLHttpRequest calls into the C# code.

Conclusion

I have shown in this article that it’s possible to display simple HTTPS pages with invalid certificate inside WebView in UWP Windows Store apps. For sites with valid self-signed certificate it’s possible to use whitelisted certificate or certificate root in app manifest, for pages with other certificate validation errors it’s possible to handle all HTTP request with custom IUriToStreamResolver class.

In my opinion the fact, that WebView does not support opt-in for displaying HTTPS pages with invalid certificates is a problem that should be fixed. If you agree with me, please vote for these two UserVoice issues, thanks!

Did you like this article, have you found it helpful, or do you know other methods for displaying HTTPS page with invalid certificate in UWP WebView? Please let me know either here in the discussion or on my Twitter, thanks!

Building Windows Store .appxupload packages using PowerShell

In this article I’ll show you how you can easily build Windows Store apps using PowerShell, without launching Visual Studio. Specifically how to build signed .appxupload packages that can be uploaded to Dev Dashboard straight away.

First some summary, by Windows Store apps I mean Windows 8, Windows 8.1, Windows Phone 8.1 (XAML) or Windows 10 (UWP) apps. All these apps use .appx package format when building in Debug mode in Visual Studio.
When creating Windows Store package for your app, you typically use these steps:

1. First, if not done previously, you need to Associate App with the Store. Before you can do that you need to login to Visual Studio with your Windows Store Microsoft Account using two factor authentication, typically using verification code on phone or sent to you by email. After that in the first step unique app name is reserved, app name, publisher name and publishers’ signing .pfx certificate is downloaded to you solution and these data are set in your Package.appxmanifest file.

appx.1


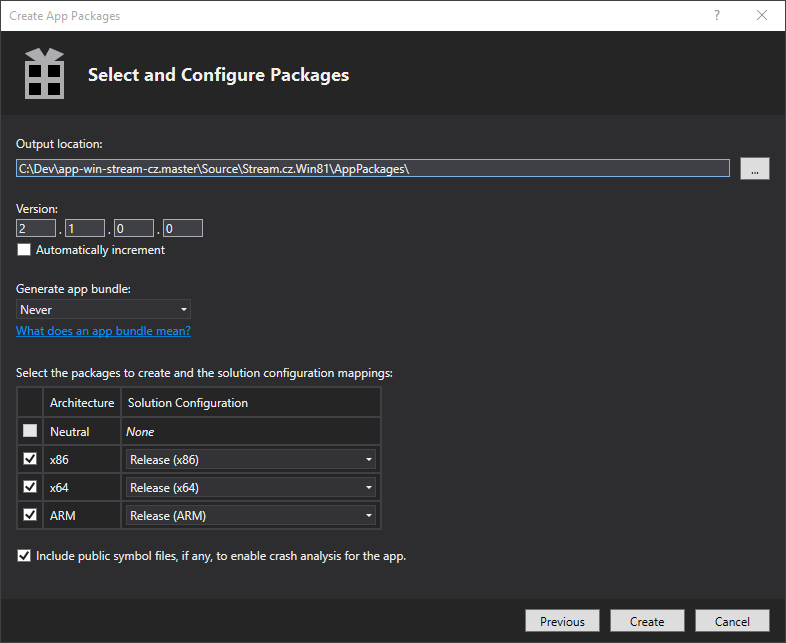
2. Then you need to build the package for Store, this is typically done using the Create App Packages command. In the wizard that shows up it’s possible to select target version, bundle option, architecture and solution configuration and option to include debug symbols. After then the solution is built and packaged.

appx.2

As you can see this is not exactly easy to do and definitely not suitable for automatic builds on your VSO or TeamCity Continuous Integration server.


Since Visual Studio 2013 I was trying to replicate the process that Visual Studio is doing when building app to Store using the Create App Packages Wizard. From what I found this process consist of several steps:

  • msbuild.exe builds the solution in Release mode.
  • makeappx.exe creates .appx package based on a map file containing list of all required files.
  • signtool.exe signs the appx with my private pfx certificate.
  • pdbcopy.exe copies all PDB files related to all dll, exe or winmd libraries without private symbols.
  • These PDB symbols are zipped into .appxsym file.
  • Signed .appx file together with .appxsym is zipped into .appxupload final file.

Details about these steps are described in this nice article: Create a Windows Store AppX package and sign it

I spent about two days packing all these steps into single PowerShell script file but then I made huge discovery – that when building Windows Store app in Release mode using Visual Studio 2015 msbuild, it automatically builds signed .appxupload file for the Store as well!

I was testing the same commands about year or two ago with Visual Studio 2013 and I am almost sure that VS2013 does not create .appxupload packages just like that.

To sum it all up, what to do to build Windows Store packages using PowerShell? First associate your app with Store using Visual Studio, select your preferred Store package configuration and build the packages at least once using the wizard. After that make sure to save all your changes to the solution and project file. These project settings will be then automatically used when building the solution using PowerShell. Then just grab this script, enter you solution name, run it in the folder with your solution and you are done 🙂

# tools
$msbuild = "C:\Program Files (x86)\MSBuild\14.0\bin\MSBuild.exe"
set-alias msbuild $msbuild
 
# solution settings
$sln_name = "TestSolution.sln"
$vs_config = "Release" 
$vs_platfom = "x86"
 
# call the rebuild method
Write-Host "Building solution`n" -foregroundcolor Green
msbuild $sln_name /t:Build /p:Configuration=$vs_config /p:Platform=$vs_platfom /v:q /nologo

What is even better about this – you can build Store packages without entering your Microsoft Account credentials every time. Note in my case I’m not using appx bundle settings and I need to repeat these steps for ARM and x64 Configuration.


After that only two unsolved tasks remain:

  • How to run Windows App Certification Kit from PowerShell and display the results in TeamCity/VSO?
  • How to upload the .appxupload package to Store automatically and release it as a new beta version of my app?

The first task might be possible, I’ll try to dig into this soon and post my findings in another article.
The second feature is still not available since there is no public Windows Store REST API for gathering data about apps from Store/Dashboard or publishing new beta builds automatically. If you think just like me that this should be implemented, please vote here in WPdev UserVoice web for this idea, thanks!

UWP quick tip – getting device, OS and app info

In this article I’ll show you few useful tips when developing any Windows 10 UWP app – how to get basic data about current device, operating system and application. You might need all that info for logging or custom app analytics or maybe in a footer of a support mail generated in the app.

The goal – I want to know in my application:

  • current OS family – phone/desktop/…
  • current OS build number – 10.0.10240.16413
  • current OS architecture – x86/x64/ARM
  • current App Display Name – Battery Tile for instance
  • current App Version – 3.0.2.0
  • current Device manufacturer – Nokia
  • current Device model – Lumia 1520

Since Windows Phone 8 basically all APIs we used to gather these data have changed, but I’ve done the work for you, here’s a helper class with all these properties:

using Windows.ApplicationModel;
using Windows.Security.ExchangeActiveSyncProvisioning;
using Windows.System.Profile;
...
public static class Info
{
    public static string SystemFamily { get; }
    public static string SystemVersion { get; }
    public static string SystemArchitecture { get; }
    public static string ApplicationName { get; }
    public static string ApplicationVersion { get; }
    public static string DeviceManufacturer { get; }
    public static string DeviceModel { get; }
 
    static Info()
    {
        // get the system family name
        AnalyticsVersionInfo ai = AnalyticsInfo.VersionInfo;
        SystemFamily = ai.DeviceFamily;
 
        // get the system version number
        string sv = AnalyticsInfo.VersionInfo.DeviceFamilyVersion;
        ulong v = ulong.Parse(sv);
        ulong v1 = (v & 0xFFFF000000000000L) >> 48;
        ulong v2 = (v & 0x0000FFFF00000000L) >> 32;
        ulong v3 = (v & 0x00000000FFFF0000L) >> 16;
        ulong v4 = (v & 0x000000000000FFFFL);
        SystemVersion = $"{v1}.{v2}.{v3}.{v4}";
 
        // get the package architecure
        Package package = Package.Current;
        SystemArchitecture = package.Id.Architecture.ToString();
 
        // get the user friendly app name
        ApplicationName = package.DisplayName;
 
        // get the app version
        PackageVersion pv = package.Id.Version;
        ApplicationVersion = $"{pv.Major}.{pv.Minor}.{pv.Build}.{pv.Revision}";
 
        // get the device manufacturer and model name
        EasClientDeviceInformation eas = new EasClientDeviceInformation();
        DeviceManufacturer = eas.SystemManufacturer;
        DeviceModel = eas.SystemProductName;
    }
}

Some comments:

The property DeviceFamilyVersion contains plain string with a long value containing the OS version. All we need to do is convert it back from string to long and convert each short number back to readable format.

The object Package contains lot of useful data including Package Family Name. You might need this property for some future advanced application contracts, so keep this in mind.

The SystemArchitecture property actually tells you the type of the installed package, not the OS architecture, but if you publish all three platform packages for x86, x64 and ARM, it will match the OS architecture.

DeviceManufacturer and DeviceModel might not be defined on custom built PCs. Also on phones the SystemProductName contains the phone name in non-readable format like RM-940_nam_att_200. To convert this name to readable format Lumia 1520 you can use the Phone Name Resolver library.

Here’s a sample of properties gathered on my notebook:

Windows.Desktop
10.0.10240.16413
X64
Info Test
1.1.0.0
ASUSTeK Computer Inc.
N53SN

and here on my dev phone:

Windows.Mobile
10.0.10166.0
Arm
Info Test
1.1.0.0
NOKIA
RM-940_nam_att_200


And that’s all 🙂 If you know any other useful system properties, just let me know.

New API for changing Start screen background image in Windows 10 v10166

Windows 10 Insider Preview v10166 was just recently released for PCs and Phones, together with related SDK.

In this short article I’ll show you how to use new API for changing Desktop/Start screen background image, that is first available in this version.


The API is located in new class UserProfilePersonalizationSettings in the Windows.SystemUserProfile namespace. It has currently only few members:

public sealed class UserProfilePersonalizationSettings : IUserProfilePersonalizationSettings
{
    public IAsyncOperation<bool> IUserProfilePersonalizationSettings.TrySetLockScreenImageAsync(StorageFile imageFile);
    public IAsyncOperation<bool> IUserProfilePersonalizationSettings.TrySetWallpaperImageAsync(StorageFile imageFile);
    public static bool IsSupported();
    public static UserProfilePersonalizationSettings Current { get; }
}

For changing the background image you just need to get StorageFile of your image and call TrySetWallpaperImageAsync and that’s all. Complete code sample could look like this. Note I have placed newbg.jpg image in the root folder of my project and set the compile option to Content:

private static async Task ChangeStartWallpaper()
{
    if (UserProfilePersonalizationSettings.IsSupported())
    {
        StorageFile newBg = await StorageFile.GetFileFromApplicationUriAsync(new Uri("ms-appx:///newbg.jpg"));
        UserProfilePersonalizationSettings ups = UserProfilePersonalizationSettings.Current;
        await ups.TrySetWallpaperImageAsync(newBg);
    }
}

I’ve tested this API just now and it works both on phone and PC. Strangely it works immediately, no question asked. There should probably be some kind of dialog or settings that only selected app can change these image. I can imagine two apps fighting to change the background images in background tasks.

That’s all for now. I really like this simple new API that will make a great addition to my Windows and Windows Phone apps Astronomy Image of the Day that already can change the lockscreen image with daily astro photo.